The surprising things you learn when designing a solar system
After spending months of solar research online and watching a plethora of videos on all subjects solar, I was pretty sure I knew what I was doing when I purchased the solar panels , inverter and battery from shopsolarkits.com. Little did I know that much was hidden beneath the surface. This is a work in progress, so please verify with your solar installer before acting on some of the ideas mentioned here.
You won't find everything online
That was the lesson I learnt the hard way after spending months of researching solar online and watching all the videos I could possibly find. It surprises me that, they never really talk about the basics. So, you think you know everything - but once you make that large purchase , no matter how well everything was described to you, things change when the technical team looks at the purchase and finds missing things.
I was on a learning experience, so it was ok. But I can see why solar customers may feel frustrated when they thought they knew what they were getting, but actually when things come together, you see you missed quite a lot. My goal was to go through the same process my customers would go through when working with us on their solar project. I learned a lot in this process.
I did the best I could - and I have to confess, even with my Electronics background, I had trouble. I can see why people may feel cheated or taken advantage of, even when everyone does everything right, because you learn something new everyday as a solar customer, which you could not even imagine before. Adding all those little details I learned along the way, I ended up with a 22 page document which listed everything I would need, and also would let me checklist the install after it had been done. Solar Installers do it every day, it is possible they may miss something with a specific design.
At the end of the day, I believe extensive discussions with the sales and support team at shopsolarkits.com really helped to make sure that install day would go smoothly as we had all the parts we needed along with a solid plan for extendability in the future. Just as with anything else, unless you get into the weeds, you will miss a lot of things!
I started with solar radiance, because I knew which parts of my roof melted snow the fastest - hence it was easy to understand from that and Google where the solar panels should be, and how they should be organized based on the shading and direction. This is how it looked for a random house address, I found online within the Google Project Sunroof website:
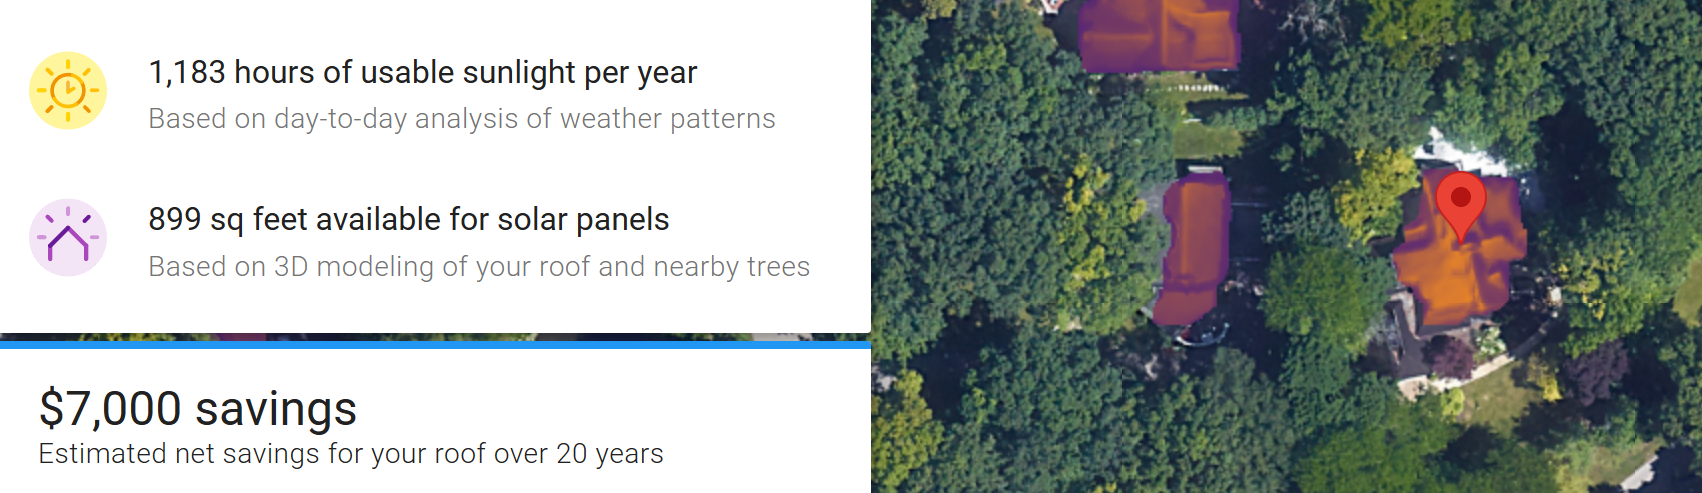
It is important to remember that panels should cover all south facing roofs first (use your iPhone compass app like I did, if you are directionally challenged), then you can go with east and west facing roofs. If any panels are left, you could finish with north facing panels. Honestly, it is not worth it to put panels in unoptimal directions like North.
Unless, you really need to extract every last bit of sun because your needs are very great, just get only as many panels as would cover the best areas on your roof. You will have plenty of opportunity to spend money elsewhere, if you have cash to spare.
How did I know which roofs were best for solar?. Part of the answer is the directions, and once the direction and shading are set, if you live in a state which gets snow, you can indirectly know which roofs get the most sunlight from the snow melt. As an example, the south-facing, house roof and west-facing, garage front-roof melts snow very, very quickly. They clearly get a lot of sunlight. The east-facing rear garage roof has a lot of shade and never melts snow for weeks on end. The north-facing, house roof sits somewhere in between in terms of snow melt, but it gets no shade - just a bad direction.
Only design the strings after you get the manual for your inverter. Even if you do that, you might end up finding that your assumptions were wrong. If the solar charger is 4kW, you don't stuff it with 10 400-watt panels as I found out, you use 9 400-watt panels in groups of three. That was something I only learnt when the Tech people at shopsolarkits.com sent me the design:
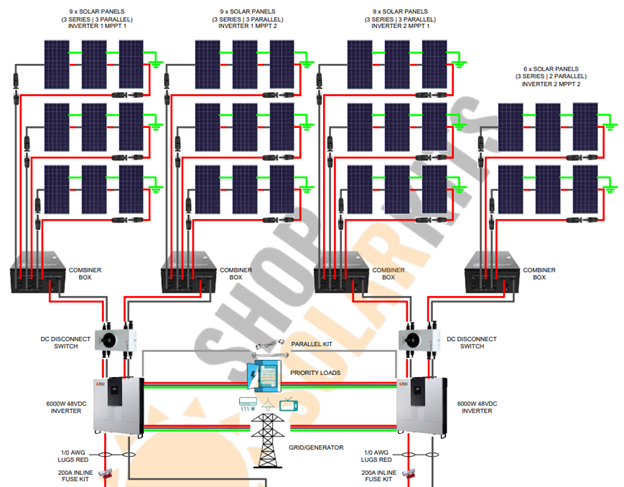
They also agreed with my design of connecting a solar charger to panels in areas with the same or similar radiance so that shading in one area won't affect all panels connected to the solar charger. I spent many days optimizing my solar panels to be grouped in areas with the same amount of shading or no shading at all. It might mean a contiguous set of panels which cover most of a roof, but the last 3-4 panels with shade are connected to another set of panels in a similarly shaded area.
I doubt any company would spend as much time as I did designing the solar panels to be placed correctly. It is just too painstaking to do. Nobody would possibly have time to get into that level of detail except the customer.
I learnt the hard way that inverters from the same manufacturer may not be the same, and you really need to read the user manual before making an inverter purchase. I guess cost is a factor, so I just went the way any other customer would, but still some poking around will only do you good.
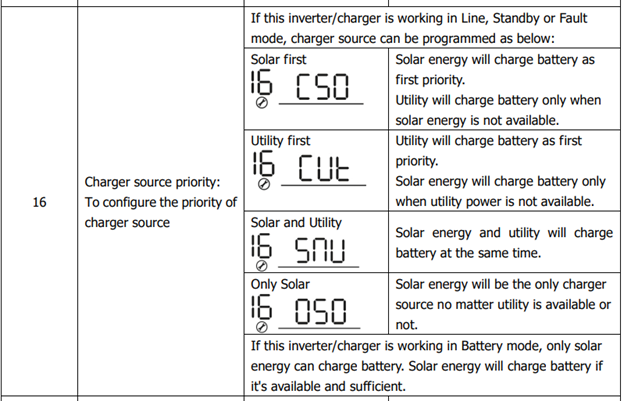
Unable to find the manual for the inverter I purchased, I found another one online. That one had an Output Source Priority setting where you could configure the grid as a backup when solar fell short, which let you exclude the battery. It had a separate mode where you could do solar, then battery, then the grid.
The one I purchased was cheaper, and it could NOT exclude the battery in any mode except utility only. Maybe the manual had a mistake, because you really cannot exclude the battery from a Hybrid Inverter design (because it affects the stability of the solar output which can vary), but maybe not:
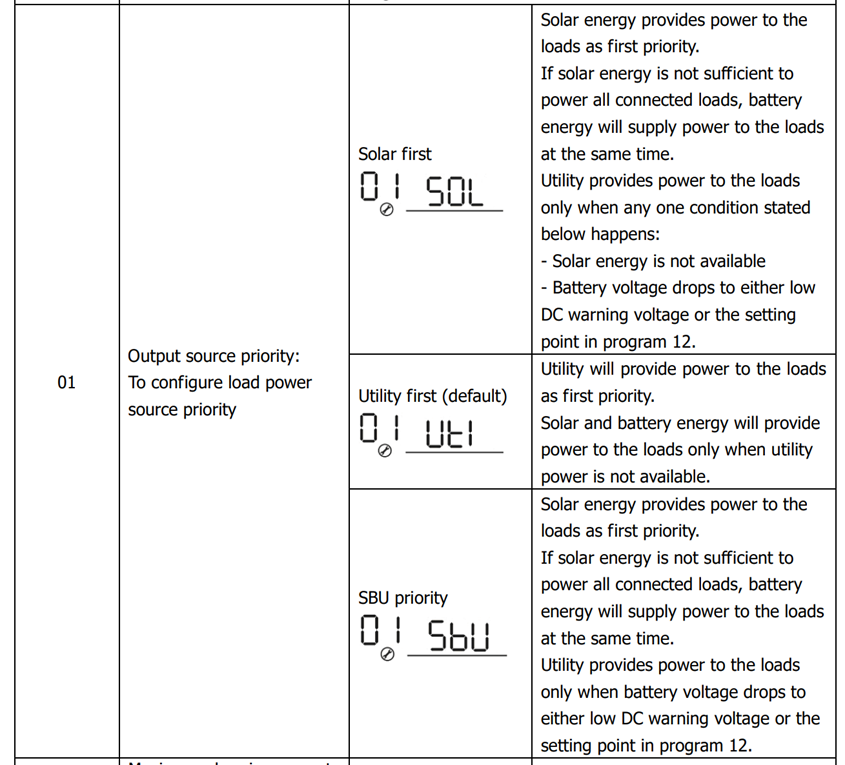
There are subtle differences on what powers your circuits, based on the inverter you purchase. You need to spend all the time you have and more understanding that completely before you purchase an inverter for sure. My budget prevented me from getting anything better; but it does not hurt to know your options. Always ask for the user manual and the wiring diagram for the inverter and the number of panels you are purchasing BEFORE making the purchase.
The Charger Source Priority is another setting you should pay attention to. Solar probably won't cover the complete power usage for customers who use a lot of power. So, you need to let both the Utility and solar charge the batteries. I need to find a way to ensure that the grid powers the batteries only during off hours, because my inverter does NOT support scheduling (atleast as far as I have discussed with tech so far).
I need to find a workaround - an app, a PC connected to the inverters; something to let me not use utility during peak hours. I might just have to put a Blink camera in front of the inverters so I can see what they are doing at any point in time. I hope their app works, or there is some way to get remote monitoring capability. Now I see why Span.IO is needed! (but too expensive if an install is $12k). I can see Span Panel as a good way to shut down loads especially if you have a Hybrid Solar Inverter, not that many batteries and a possibility of overload.
On a positive note, I saved thousands by making the purchase on Black Friday. To be precise almost $4,500. My wallet is screaming from the overload, but atleast I saved thousands. I just have to keep it tight for 2 months, till I pay back everything. Apparently, they were selling some components at a loss on Black Friday. I could not get them to give me the same price, even though we were editing the old order because I missed a few parts, because they did not tell me about it. But it was good to save the last dollar possible! This is expensive.
The battery capacity is something you should pay attention to. The conclusion we came to was that I needed 4 batteries "immediately" only if all my panels produced 100% of their output. Because 1/2 my panels are not in pristine, unshaded areas and south facing, I could only expect to get 25% output from half my panels. Meaning 75% on a good day. It took a long time to finalize this design:
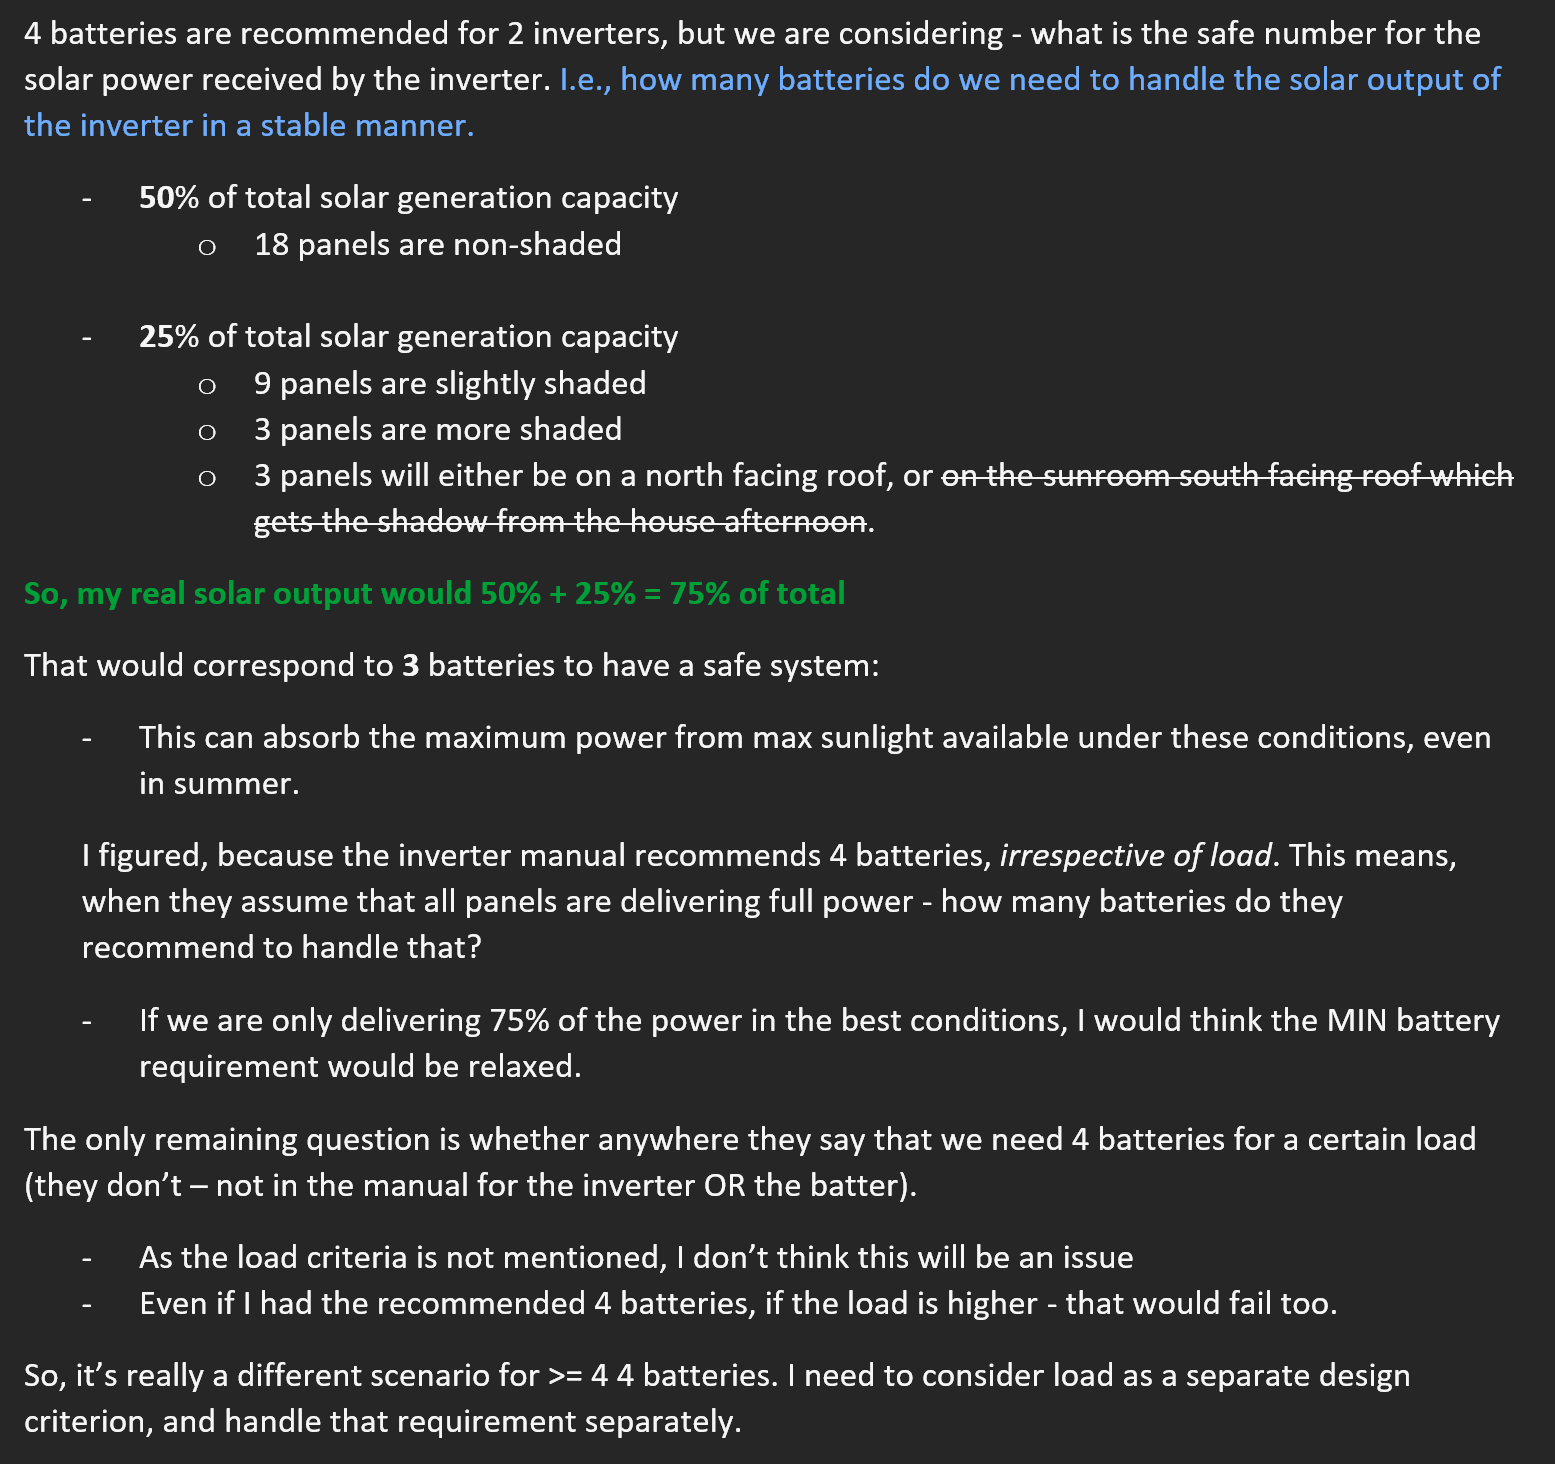
So, I need 3 batteries for the Inverter. For the loads, it is a different matter to figure out how many batteries would be needed so I could run everything, all the time on solar or battery, relying very sparingly on the grid. This maybe hard to follow, but you will get it along the way of your own solar journey.
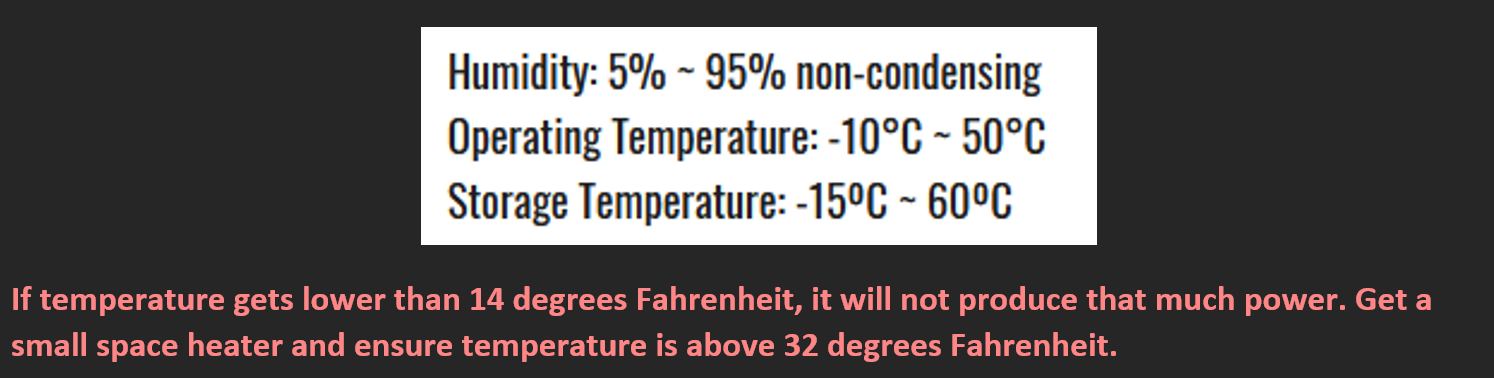
Inverters and batteries need to be stored in a temperature controlled, clean environment. This totally makes sense when you think of a string inverter which is a large box with a easily faultable transformer inside which can fail, and which can get really hot. It totally makes sense to keep it in the coolest place of the house - usually the Basement. Inverters has a much higher tolerance for cold temperatures (much better than batteries):
 Inverter Operating Temperature
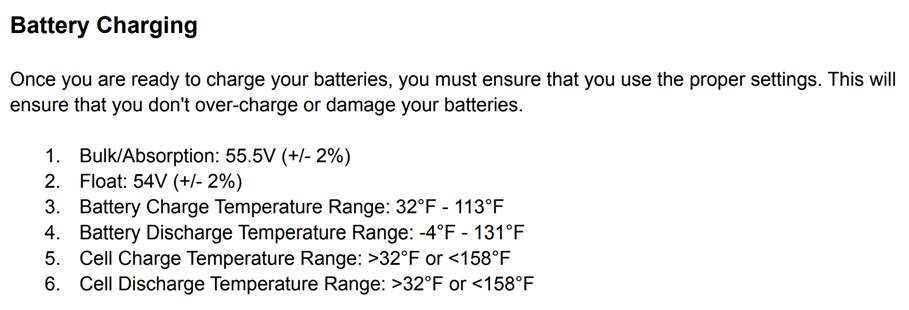
Batteries are a different matter - they can handle high temperatures, but cold NOT so much. That means having a small space heater to ensure the temperature does not go below the Inverter or the Battery's minimum threshold values. I plan to get an HVAC outlet near the batteries and an inlet near the inverters. The higher temperature thresholds will never get too high for my area.
 Battery Charging Temperature
Unfortunately, it took me a while to really understand how exactly the inverter is wired to the home circuits. You have a sub panel with only the circuits you need to power from solar connected to it. The best way to visualize this is approximately like the below:
The reason why the main panel is connected to the sub panel and vice-versa, is as I understand it, you disconnect the solar powered circuits from the main panel, and connect it to the sub panel, but the wires need to go back because right now, every wire in your house goes to the rooms from the main panel. Also, in the words of the tech: "In a sense, the Hybrid Inverter is connected to the grid, for its own backup power".
The problem with this Hybrid Inverter based, zero export, grid tied system is that, unless the batteries can fully handle the load, you will get overloads. So, you really need to spend a lot of time figuring out which circuits to connect to solar, and which to exclude - in excruciating detail , because it is best to do the wiring once, and have it flexible enough to be easily modified later.
I went through a lot of pain staking back and forth about what circuits to run off solar, and what NOT to. In the end, I ended up with a design having two sub panels - one connected to solar, which could be handled by the 3 batteries I got; and another sub panel, which would be grid tied, but kept right alongside the inverters, so we could connect it to solar, once I purchased the additional batteries to get to 4-6 batteries.
This process was not easy. It was very, very hard. But you have to go through with it - otherwise you will be cursing yourself and everyone else later, even if everyone did the best they could under the circumstances . I don't think ANY solar company would realistically go through all this trouble for you because it is almost like a shrink session where you have to keep pushing over and over again to figure out what decision to make . Even if they ask the right questions, you will most probably provide the wrong answers in the moment. This is truly something you need a lot of time to think about to make the right decision.
Here are the circuits I doubt I would connect to solar ever, because either they are not critical, or they have very high power usage. If you remember, I need to consider whether a load is critical or not, because my current inverter will always use battery after solar in the daytime. So, these loads really need to be supported by solar + battery. These will continue to live on the Main Panel:
Main Panel (not on solar, long-term)
- Kitchen Counter - electric oven, mixer grinder & air fryer (7,450 watts)
- Island outlet - double waffle maker (1,000 watts, rarely used)
- Garbage Disposal in Kitchen sink (828 watts, used in spurts)
- Electric Baseboard Heaters in the Basement (1,500 watts each, have HVAC vents, so not needed to be used)
Sub Panel #2 will not be connected to solar for now, because we don't yet have the battery capacity to run these loads off solar. However, it totally makes sense to add the batteries before summer, so that we don't get those super-high $650 electric bills because of AC/ HVAC usage. It is important to remember that the values are for when these appliance are running; it does not consider the power spike required to start for example the HVAC/ Dryer Unit. It is the same for a Fridge as well. You probably need MORE battery than the total power usage value.
Sub Panel #2 (not on solar, short-term)
- HVAC + Condensor Unit Fan (3,500 watts)
- Washing Machine (1,440 watts)
- Dryer (3,120 watts)
- Roof Heating Cables (240 watts used in the winter for a few days to melt snow on the roof. I usually run it only at night)
Sub Panel #1 will be connected to solar. So these loads need to be carefully selected so that they are NOT too much, can run on solar and battery in the daytime, and possibly on battery only during grid outages without causing an overload, and during the night - and it can handle spikes when anything starts up. So, there are a lot of things to consider when picking these circuits. It is harder than it looks to pick them. It is definitely NOT something you want to do on Install day. Give yourself a few weeks to be satisfied with your selections.
Sub Panel #1 (powered by solar
- Fridge & Kitchen Counter (598 watts)
- Networking + Laptop + Old Intel Mac Mini (460 watts)
- Basement Outlets (400 watts)
- Office Room Heat Pump Mini Split (590 watts)
- Office Room (800 watts)
- Living Room (400 watts)
- Gas Water Heater (1,500 watts lets us stay home even if there are extended power outages)
- Kitchen & Garage Lights (200 watts)
- Gas Furnace (600 watts, keeps the house warm even if there is no grid power in the winter during an outage)
- Gaming Room (500 watts)
- Bedroom (100 watts)
- Dinette (20 watts)
- Sunroom (200 watts)
- Bathroom (10 watts)
- Microwave (1,000 watts - thought long and hard on this one, because we could get by on the gas cooking range. this is honestly not used a lot)
- Dishwasher (1,200 watts - another one where I thought long and hard, we really only use it mostly at night during week days which are off hours, and the only day usage is on holidays and weekends, which we can try to avoid)
That's about it for now. I think this article covers most of my solar journey before purchase. I will update it, in case I learn anything new before the install.
- TJ
Published Nov 30, 2022
Update #1 Dec 1, 2022